Roof replacement is the process of removing an old or damaged roof and installing a new one to protect a building from weather and structural damage. It involves updating roofing materials, repairing the underlying structure, and ensuring proper waterproofing and ventilation.
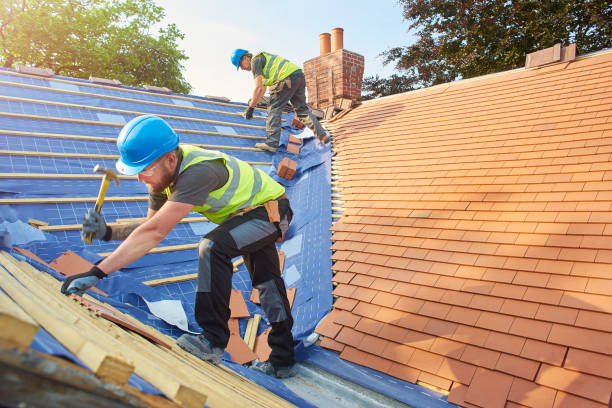
A complete roof replacement procedure in Cumbria starts with the removal of the existing roofing materials, inspection and repair of the underlying structure if needed, installation of a waterproof underlayment, fitting of new roofing materials such as slate, tiles, or shingles, installation of flashings around chimneys, vents, and valleys to prevent leaks, proper ventilation and insulation where required, and a final inspection to ensure the roof is secure, watertight, and finished to a high standard.
Here is a complete checklist for roof replacement in Cumbria:
- Removal of Existing Roofing Materials: Removal of Existing Roofing Materials includes carefully stripping away old shingles, tiles, slates, or membranes to expose the roof structure for inspection and preparation.
- Inspection of Roof Structure: Inspection of Roof Structure includes checking rafters, joists, decking, and supports for damage or weakness to ensure the roof can safely hold the new materials.
- Structural Repairs: Structural Repairs includes fixing or reinforcing any damaged timber, beams, or decking to create a stable and secure base for the new roof.
- Waterproof Underlayment Installation: Waterproof Underlayment Installation includes laying a protective layer that prevents water ingress, keeping the home dry even if outer materials are damaged.
- Installation of New Roofing Materials: Installation of New Roofing Materials includes fitting the selected roof covering—slate, clay or concrete tiles, asphalt shingles, metal, etc.—to provide long-term protection and aesthetic appeal.
- Flashing Installation: Flashing Installation includes fitting metal strips around chimneys, vents, valleys, and edges to prevent leaks at vulnerable points.
- Ventilation and Insulation Work: Ventilation and Insulation Work includes ensuring proper airflow and thermal efficiency to reduce damp, condensation, and energy costs.
- Gutter and Drainage Check: Gutter and Drainage Check includes repairing or adjusting gutters and downpipes to ensure rainwater flows correctly off the roof, preventing water damage.
- Skylight, Dormer, or Roof Feature Installation: Skylight, Dormer, or Roof Feature Installation includes adding or maintaining roof features while ensuring they are waterproof and secure.
- Final Quality Inspection: Final Quality Inspection includes confirming that the new roof is correctly installed, watertight, safe, and visually appealing.
- Site Clean-Up: Site Clean-Up includes removing old roofing materials, debris, and protective coverings to leave the property clean and safe.
- Warranties and Documentation: Warranties and Documentation includes providing guarantees for materials and workmanship, giving homeowners long-term peace of mind.
A complete roof replacement in Cumbria involves a thorough assessment of your roof’s condition, setting a realistic budget, and selecting the right materials for durability and weather resistance. You then hire a trusted local Cumbrian roofer, check if planning permission is needed, and prepare your home for the work. During the project, progress is monitored to ensure quality and adherence to the plan, and once complete, a final inspection is conducted to confirm proper installation, flashing, waterproofing, and site clean-up, with all contracts and warranties retained for peace of mind.
- Assess Your Roof’s Condition: Before starting any work, inspect your roof for visible damage like missing tiles, sagging sections, water stains, or moss. A professional roofer can detect hidden problems and advise whether repair or full replacement is needed.
- Set a Realistic Budget: Roof replacement is a significant investment, including materials, labour, scaffolding, and waste disposal. Comparing multiple quotes helps ensure fair pricing and prevents unexpected costs.
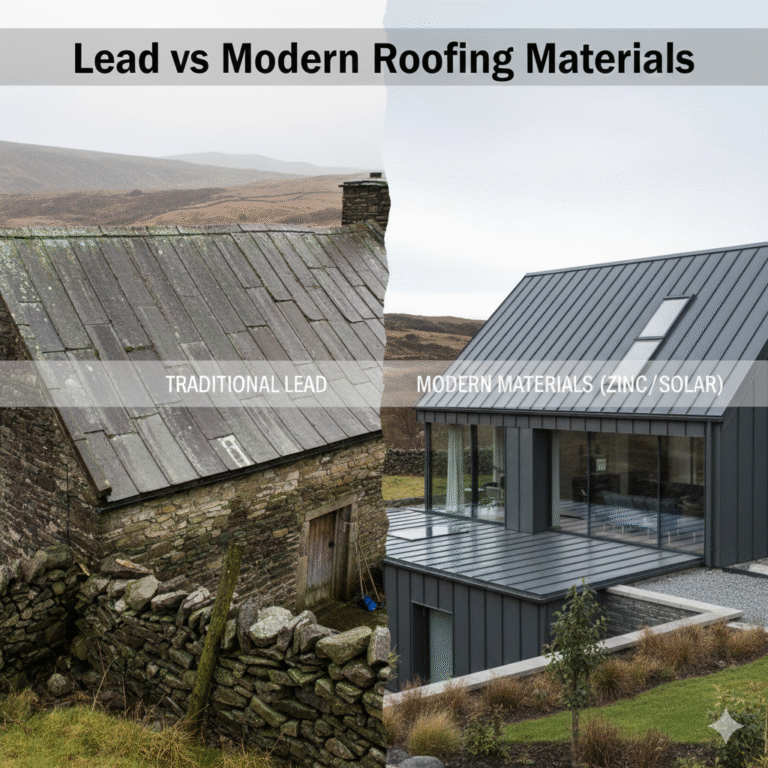
- Choose the Right Roofing Materials: Select materials suitable for your home, climate, and aesthetic preferences, such as slate, clay tiles, concrete tiles, asphalt shingles, or metal roofing. The right choice ensures durability, weather resistance, and long-term protection.
- Find a Trusted Local Roofer: Hire an experienced, qualified, and insured roofer who understands local weather, building styles, and property access challenges. Always request a detailed roof plan and compare at least three quotes for transparency.
- Check Planning Permission Requirements: Confirm with your local council whether planning permission is needed, especially for listed buildings, conservation areas, or National Parks. This ensures your project complies with legal regulations.
- Prepare Your Home: Clear your loft, protect gardens and outdoor spaces, notify neighbours, and consider temporary accommodation if needed. Proper preparation helps the project run smoothly and safely.
- Monitor the Project Progress: Stay involved while the work is being done, checking that materials match your selections and that the roofer follows the agreed plan. Regular communication prevents misunderstandings and ensures quality work.
- Conduct a Final Inspection: Once the roof is complete, inspect the installation, flashing, and waterproofing, and ensure the site is clean. Keep all contracts, warranties, and permits for future reference and peace of mind.
Removal of Existing Roofing Materials
Removal of Existing Roofing Materials includes carefully stripping away old shingles, tiles, slates, or membranes. This step exposes the roof structure, allowing for a thorough inspection and preparation for the new roofing system. Removing damaged or worn materials is essential to ensure the longevity and safety of the replacement roof.
Inspection of Roof Structure
Inspection of Roof Structure includes checking rafters, joists, decking, and supports for any damage, rot, or weakness. A detailed inspection ensures that the roof can safely support the new materials and helps identify areas that require reinforcement or repair before installation begins.
Structural Repairs
Structural Repairs includes fixing or reinforcing any damaged timber, beams, or decking to create a stable and secure base for the new roof. Proper structural work prevents sagging, leaks, and long-term damage, providing a strong foundation for all subsequent roofing steps.
Waterproof Underlayment Installation
Waterproof Underlayment Installation includes laying a protective layer beneath the roofing material. This barrier prevents water ingress, keeping the home dry even if outer materials are damaged or during extreme weather conditions. It is a critical step for long-term durability and protection.
Installation of New Roofing Materials
Installation of New Roofing Materials includes fitting the selected roof covering, such as slate, clay or concrete tiles, asphalt shingles, or metal roofing. This step ensures the home is fully protected while providing the desired aesthetic appeal and complying with local building standards.
Flashing Installation
Flashing Installation includes fitting metal strips around chimneys, vents, valleys, and edges to prevent leaks at vulnerable points. Properly installed flashing is essential for directing water away from areas prone to seepage, safeguarding the interior of the property.
Ventilation and Insulation Work
Ventilation and Insulation Work includes ensuring proper airflow and thermal efficiency throughout the roof space. Adequate ventilation prevents damp, condensation, and mould growth, while insulation improves energy efficiency and helps maintain a comfortable indoor environment.
Gutter and Drainage Check
Gutter and Drainage Check includes repairing or adjusting gutters and downpipes to ensure rainwater flows correctly off the roof. Effective drainage prevents water pooling, leaks, and structural damage to the roof and surrounding areas.
Skylight, Dormer, or Roof Feature Installation
Skylight, Dormer, or Roof Feature Installation includes adding or maintaining roof features while ensuring they are waterproof and securely integrated. Proper installation prevents leaks and contributes to the overall functionality and appearance of the roof.
Final Quality Inspection
Final Quality Inspection includes confirming that the new roof is correctly installed, watertight, safe, and visually appealing. This step verifies that all materials and workmanship meet quality standards and that the roof is ready to provide long-term protection.
Site Clean-Up
Site Clean-Up includes removing all old roofing materials, debris, and protective coverings from the property. Cleaning the site ensures safety, prevents hazards, and leaves the home ready for occupancy without disruption.
Warranties and Documentation
Warranties and Documentation includes providing guarantees for materials and workmanship. Keeping proper records and warranties gives homeowners long-term peace of mind and ensures protection in case of future issues.
That was all about a complete roof replacement checklist. Now, we will move on towards the complete procedure of roof replacement in Cumbria:
Step 1. Assess Your Roof’s Condition
Before replacing a roof, you need a thorough assessment. Early inspection saves money by avoiding emergency repairs later and ensures safety for your home and family.
Visual Signs: Look for missing, broken, or curling tiles, sagging sections, water stains, and moss or algae.
Professional Inspection: A certified roofer can detect hidden damage, check the structural integrity of rafters and joists, and recommend whether repair or full replacement is necessary.
Step 2. Set a Realistic Budget
Roof replacement is a significant investment. In Cumbria, costs vary depending on size, materials, and access. Costs include materials, labour, scaffolding, waste disposal, and structural work if required. Always compare multiple quotes and check what’s included to avoid surprises.
Slate Roofs: £9,000–£18,000
Clay Tile Roofs: £8,000–£16,000
Concrete Tiles: £7,000–£15,000
Flat Roofs: £3,000–£7,500
Complex New Roof Structures: £6,500–£20,000+
Step 3. Choose the Right Roofing Materials
Material selection is crucial for longevity and performance in Cumbria’s climate. Consider aesthetics, weight, weather resilience, and maintenancrequirements.
Slate: Traditional, durable, ideal for steep pitches, long-lasting and resistant to wind and rain.
Clay Tiles: Beautiful, weather-resistant, perfect for period homes, but heavier.
Concrete Tiles: Affordable and durable, though may require algae treatment in damp areas.
Asphalt Shingles: Cost-effective, suitable for most homes, but less durable in harsh weather.
Metal Roofing: Lightweight, long-lasting, and resistant to wind; ideal for modern or rural buildings.
Step 4. Find a Trusted Local Roofer
Hiring the right professional is key. Always request a detailed roof plan, including measurements, materials, flashing, ventilation, and any structural work required. Compare quotes from at least three roofers to ensure transparency and fairness. Westmorland Roofing being a local roofing contractor offers:
15+ years of experience working across the Lake District and wider Cumbria.
In-depth knowledge of local weather, stone cottages, listed buildings, and rural access challenges.
Fully qualified and insured team with glowing customer reviews.
Honest, tailored advice based on your home’s exact needs.
Step 5. Check Planning Permission Requirements
Most roof replacements using similar materials do not require planning permission. However, properties in conservation areas, listed buildings, and National Parks may require formal approval before work begins. Always check with your local council to avoid legal issues.
Step 6. Prepare Your Home
Roof replacement is noisy and messy. Preparing your home reduces stress:
Clear your loft of valuables and insulation obstructions.
Protect your garden and outdoor spaces with tarpaulins.
Inform neighbours about the project timeline.
Consider temporary accommodation for large or extended projects.
A well-prepared home ensures the project runs smoothly and safely.
Step 7. Monitor the Project Progress
Stay involved throughout the roof replacement process. Regular communication prevents misunderstandings and ensures quality workmanship. You should:
Confirm that materials match your selections.
Check work aligns with the agreed plan.
Ask questions and address concerns promptly.
Step 8. Conduct a Final Inspection
Once your new roof is complete, you need to do a final inspection. This final check guarantees peace of mind and protects your investment. You need to:
Inspect for proper installation, flashing, and waterproofing.
Ensure the site is cleared and cleaned.
Keep all contracts, warranties, and permits for future reference.
How can I tell if my roof needs replacement or repair?
Signs that a roof may need replacement include persistent leaks, missing or broken shingles, curling or blistering materials, sagging roof decks, and granule loss. These issues often indicate underlying structural wear or ageing materials that cannot be adequately repaired and may compromise the safety and waterproofing of your home.
Minor damage, such as isolated missing tiles or small leaks, may still be suitable for repair rather than full replacement. A professional roof inspection is essential to accurately assess the extent of damage, identify hidden problems, and recommend the most appropriate solution to protect your property.
What is the average lifespan of a roof in the UK?
The average lifespan of a roof in the UK is typically around 20 to 25 years, depending on the materials used and the quality of installation. Slate and clay roofs can last longer, sometimes over 50 years, while asphalt shingles may have a shorter lifespan. Local weather, such as Cumbria’s rain, wind, and damp conditions, can also affect durability.
Regular maintenance plays a key role in extending a roof’s life. Prompt repairs, clearing debris, keeping gutters clear, and checking flashings help prevent leaks, structural damage, and premature wear, ensuring long-term protection.
Is planning permission required for roof replacement?
For most properties, replacing a roof with similar materials does not require planning permission, as it usually falls under permitted development. Routine replacements that maintain the original appearance and structure are generally straightforward.
However, listed buildings, conservation areas, or properties in National Parks may need formal approval before work begins. Checking with the local council beforehand ensures compliance with regulations and avoids potential legal issues.
Can I undertake a roof replacement as a DIY project?
Full roof replacement is complex and best left to professional roofers. It requires specialised knowledge, tools, safety measures, and experience to ensure the job is completed correctly and safely.
DIY attempts can result in improper installation, leaks, or structural damage, leading to expensive repairs. Hiring a qualified roofing contractor ensures compliance with building standards, durability, and long-term peace of mind.
Are there any government incentives for roof replacement?
Yes, homeowners upgrading to energy-efficient roofs may qualify for schemes like the Renewable Heat Incentive (RHI), which provides quarterly tax-free payments over seven years for eligible domestic installations.
These incentives encourage sustainable roofing solutions, including insulation, solar roofing, and energy-efficient materials. Always confirm eligibility criteria and ensure installations meet the program’s requirements to claim benefits.
What steps should I take to maintain a newly replaced roof?
To keep a roof in optimal condition, inspect it at least twice a year and after major storms, removing debris and addressing minor damage like torn shingles or broken flashings promptly.
Additional steps include pruning overhanging tree branches, checking coated or painted roofs for fading, and reapplying protective coatings when needed. Routine maintenance maximises lifespan and ensures consistent weather protection.
How long does it take to fit a new roof?
The time required to replace a roof depends on several factors, including the size and complexity of the roof, the type of materials used, local weather conditions, and the efficiency of the contractors. Simple roofs with straightforward designs can often be completed in as little as 3 days, while larger or more complex roofs take longer.
For roofs with multiple angles, dormers, skylights, or intricate architectural features, the replacement can extend beyond 7 days. Planning for potential delays due to weather, material availability, or additional structural repairs ensures a smoother process and avoids unexpected interruptions.